Being a Java backend developer (primarily), I am struggling to keep pace with all those JavaScript frameworks for UI development. Also, I love staying in Java APIs and object models „as long as I can“ before turning to some additional frontend technology layer. There are a few options that meet this criteria, e.g. JSF (PrimeFaces being one popular implementation), GWT (is this still alive?), Vaadin and ZK.
In this tutorial, I will focus on setting up a sample ZK web application in Netbeans, and implementing some simple real world scenario from the manufacturing / IoT domain: Statistical Process Control (SPC) in a very simple form.
Let’s assume the following: you have an equipment / machine that provides data from a variety of sensors, and you are manufacturing products using this machine. Using this sensor data and feeding it into some automated „assessment“ algorithm is one pre-requisite for automated and computer aided quality control. In simple scenarios, you might define an upper and lower limit for sensor values, and constantly monitor the sensor to stay within these boundaries. Upon a violation of the upper or lower control limit, you wanna be able to automatically act – e.g. by stopping the machine, auto-tweaking machine parameters or tagging the material that went through this machine during that time.
In addition, being able to visualize sensor data in real-time, helps e.g. with tuning the machine or understanding impacts of changes you are making to it.
Whereas there are sophisticated products on the market that support this, I would like to show how to set up a simple solution to address these requirements, using ZK and Java.
Preparation
Install and configure Apache Tomcat
Downlad the latest Tomcat. Just take the latest „Core“ as a tar.gz or zip and extract it on your local disk.
Then, add Tomcat as a „server“ in Netbeans:
- Menu „Tools“
- Item „Servers“
- Button „Add Server“
- Select „Apache Tomcat or TomEE“
- Browse to the directory you extracted Tomcat to, and specify a user (I will use admin/admin for now)
- Close all dialogs
Create a Maven-based web application
Although there is Netbeans plugin for easily creating ZK applications, I prefer to do it „manually“ and using Maven. This generally creates less hassles when later building the application outside of the IDE, e.g. using Jenkins or other CI servers.
In Netbeans:
- Menu „File“
- Item „New Project“
- Category „Maven“, Type „Web Application“
- Provide a project name (I am using „zk-spc“) and point the project to your Tomcat server
Open your pom.xml and add a <repositories> section as well as dependencies. See my sample pom.xml:
<?xml version="1.0" encoding="UTF-8"?>
<project xmlns="http://maven.apache.org/POM/4.0.0" xmlns:xsi="http://www.w3.org/2001/XMLSchema-instance" xsi:schemaLocation="http://maven.apache.org/POM/4.0.0 http://maven.apache.org/xsd/maven-4.0.0.xsd">
<modelVersion>4.0.0</modelVersion>

<groupId>org.jlawyer</groupId>
<artifactId>zk-spc</artifactId>
<version>1.0-SNAPSHOT</version>
<packaging>war</packaging>

<name>zk-spc</name>

<properties>
<endorsed.dir>${project.build.directory}/endorsed</endorsed.dir>
<project.build.sourceEncoding>UTF-8</project.build.sourceEncoding>
</properties>

<repositories>
<repository>
<id>ZK CE</id>
<name>ZK CE Repository</name>
<url>http://mavensync.zkoss.org/maven2</url>
</repository>

</repositories>

<dependencies>
<dependency>
<groupId>org.zkoss.zk</groupId>
<artifactId>zkplus</artifactId>
<version>8.5.0</version>
</dependency>
<dependency>
<groupId>org.zkoss.zk</groupId>
<artifactId>zhtml</artifactId>
<version>8.5.0</version>
</dependency>
<dependency>
<groupId>org.zkoss.zk</groupId>
<artifactId>zkbind</artifactId>
<version>8.5.0</version>
</dependency>
<dependency>
<groupId>org.zkoss.zk</groupId>
<artifactId>zul</artifactId>
<version>8.5.0</version>
</dependency>
<dependency>
<groupId>commons-logging</groupId>
<artifactId>commons-logging</artifactId>
<version>1.1.1</version>
</dependency>
<dependency>
<groupId>commons-io</groupId>
<artifactId>commons-io</artifactId>
<version>1.3.1</version>
</dependency>
<dependency>
<groupId>commons-lang</groupId>
<artifactId>commons-lang</artifactId>
<version>2.4</version>
</dependency>
<dependency>
<groupId>javax</groupId>
<artifactId>javaee-web-api</artifactId>
<version>7.0</version>
<scope>provided</scope>
</dependency>
</dependencies>

<build>
<plugins>
<plugin>
<groupId>org.apache.maven.plugins</groupId>
<artifactId>maven-compiler-plugin</artifactId>
<version>3.1</version>
<configuration>
<source>1.7</source>
<target>1.7</target>
<compilerArguments>
<endorseddirs>${endorsed.dir}</endorseddirs>
</compilerArguments>
</configuration>
</plugin>
<plugin>
<groupId>org.apache.maven.plugins</groupId>
<artifactId>maven-war-plugin</artifactId>
<version>2.3</version>
<configuration>
<failOnMissingWebXml>false</failOnMissingWebXml>
</configuration>
</plugin>
<plugin>
<groupId>org.apache.maven.plugins</groupId>
<artifactId>maven-dependency-plugin</artifactId>
<version>2.6</version>
<executions>
<execution>
<phase>validate</phase>
<goals>
<goal>copy</goal>
</goals>
<configuration>
<outputDirectory>${endorsed.dir}</outputDirectory>
<silent>true</silent>
<artifactItems>
<artifactItem>
<groupId>javax</groupId>
<artifactId>javaee-endorsed-api</artifactId>
<version>7.0</version>
<type>jar</type>
</artifactItem>
</artifactItems>
</configuration>
</execution>
</executions>
</plugin>
</plugins>
</build>

</project>
At this point, test your setup by doing a „Build“ of your project, followed by a „Run“. This should fire up your browser at http://localhost:8080/zk-demoapp-1.0-SNAPSHOT/index.html and display a „Hello World“.
The ZK SPC App
Create default welcome page based on ZK
To create a welcome page based on ZK, we need to create an index.zul in our „Web Pages“ folder of the project, using the following content:
<window title="ZK SPC App" border="normal">
Hello World!
</window>
Now, let’s define this file as a welcome file, so we can launch the application by just pointing to http://localhost:8080/zk-spc-1.0-SNAPSHOT instead of http://localhost:8080/zk-spc-1.0-SNAPSHOT/index.zul. To achieve this, we need to create a WEB-INF/web.xml in our „Web Pages“ folder. Use the following content:
<?xml version="1.0" encoding="UTF-8"?>
<web-app version="2.5" xmlns="http://java.sun.com/xml/ns/javaee" xmlns:xsi="http://www.w3.org/2001/XMLSchema-instance" xsi:schemaLocation="http://java.sun.com/xml/ns/javaee http://java.sun.com/xml/ns/javaee/web-app_2_5.xsd">

<welcome-file-list>
<welcome-file>index.zul</welcome-file>
</welcome-file-list>
</web-app>
Build / Run the project to test that.
The Model
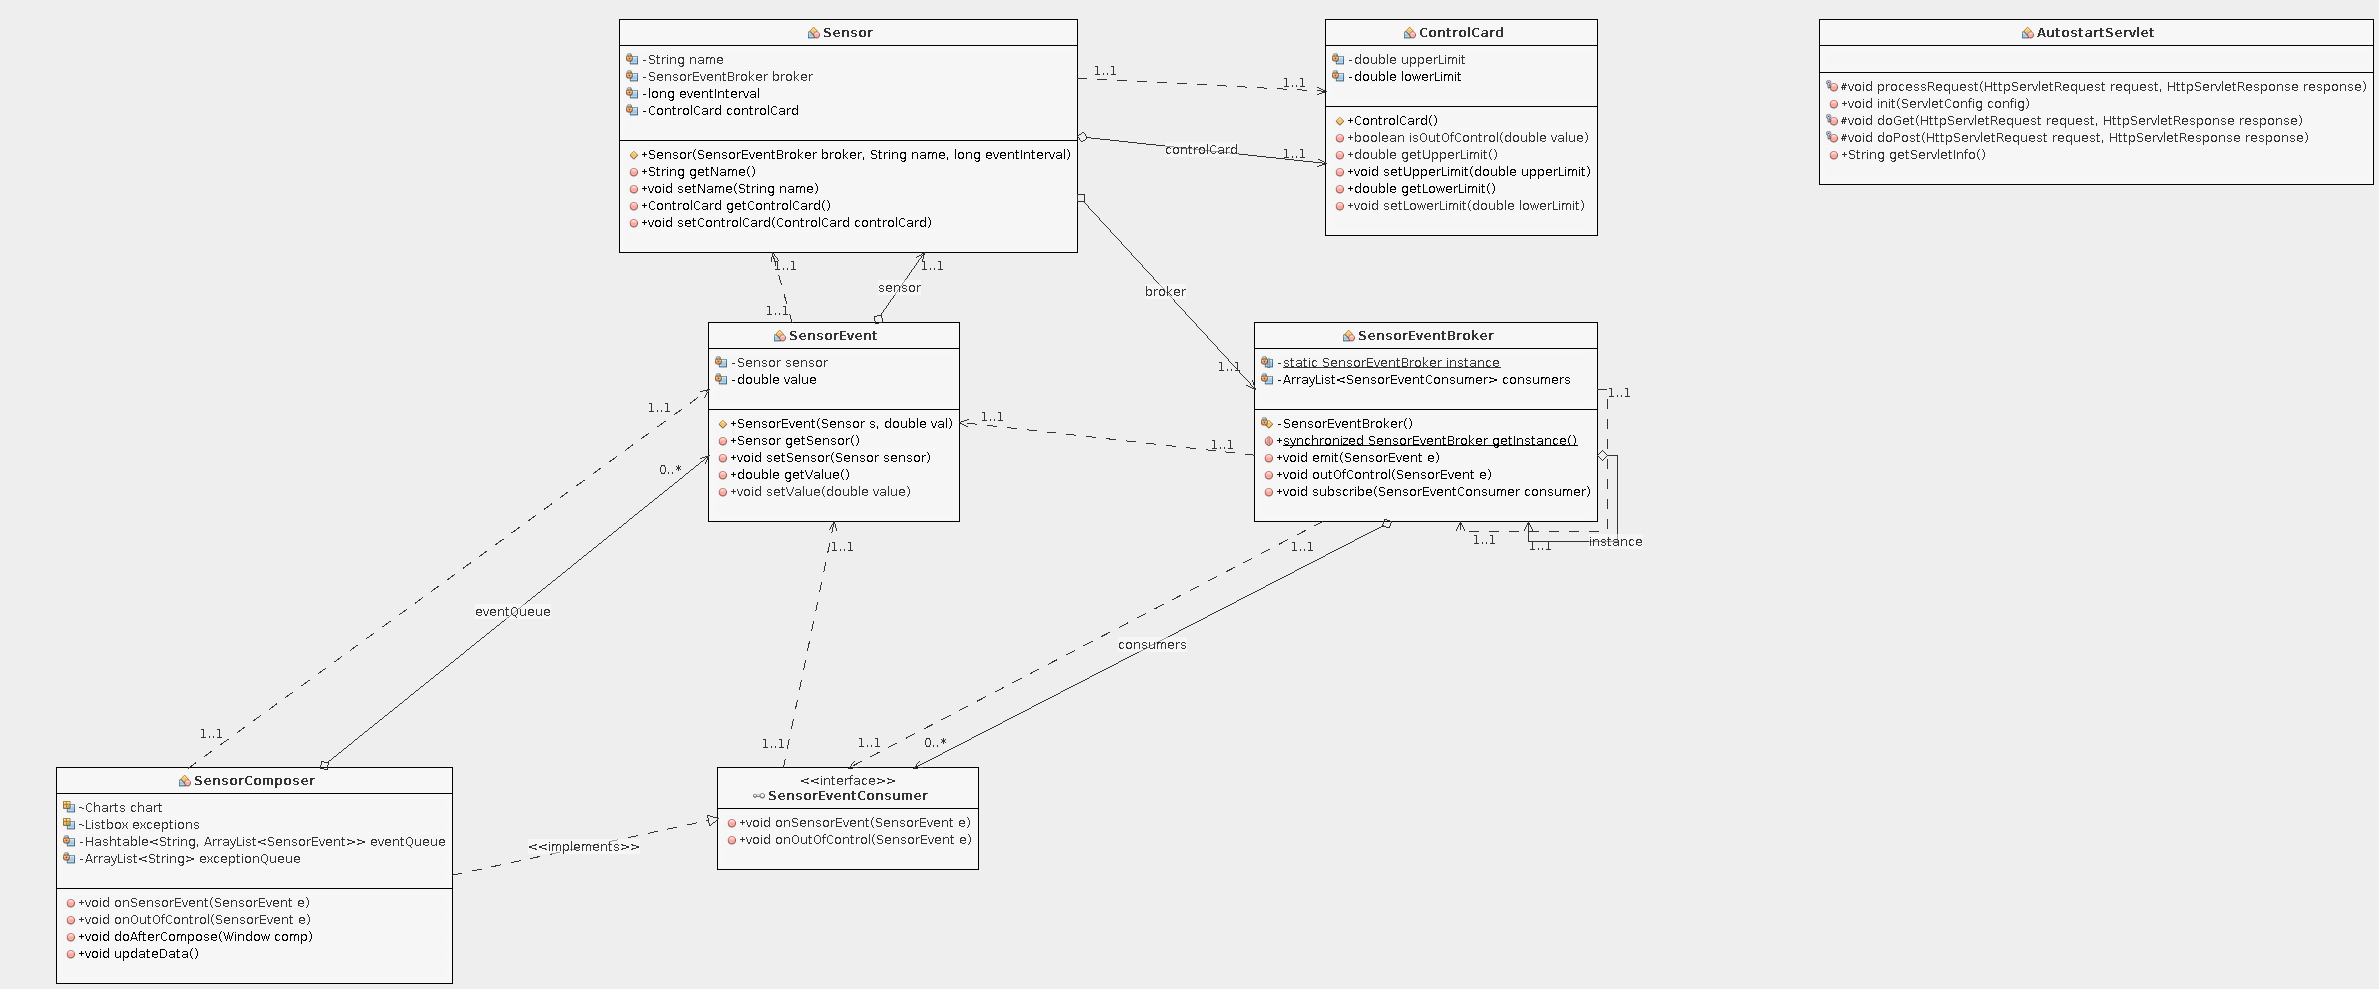
To build the application, we turn the „real world“ into an object model:
- Sensor: A component of a machine that emits data in the form of numerical values. We will give it some meaningful name.
- Sensor Event: encapsulates numerical sensor data is it arises
- Control Card: a definition of lower and upper limits that can be assigned to a sensor
- Sensor Event Broker: receives any sensor events, and forwards it to all subscribed consumers
- Sensor Event Consumer: can subscribe to sensor events using the broker and will receive events and „out of control“ exceptions when sensors violate their limits
In addition, to be able to visualized both the sensor data as it is flowing in, as well as violations as they occur, we will need a User Interface controller that implements an event consumer and updates a UI.
The View
ZK defines the view in the form of ZUL files. For our UI we will need
- a layout definition
- two sliders for lower and upper limits
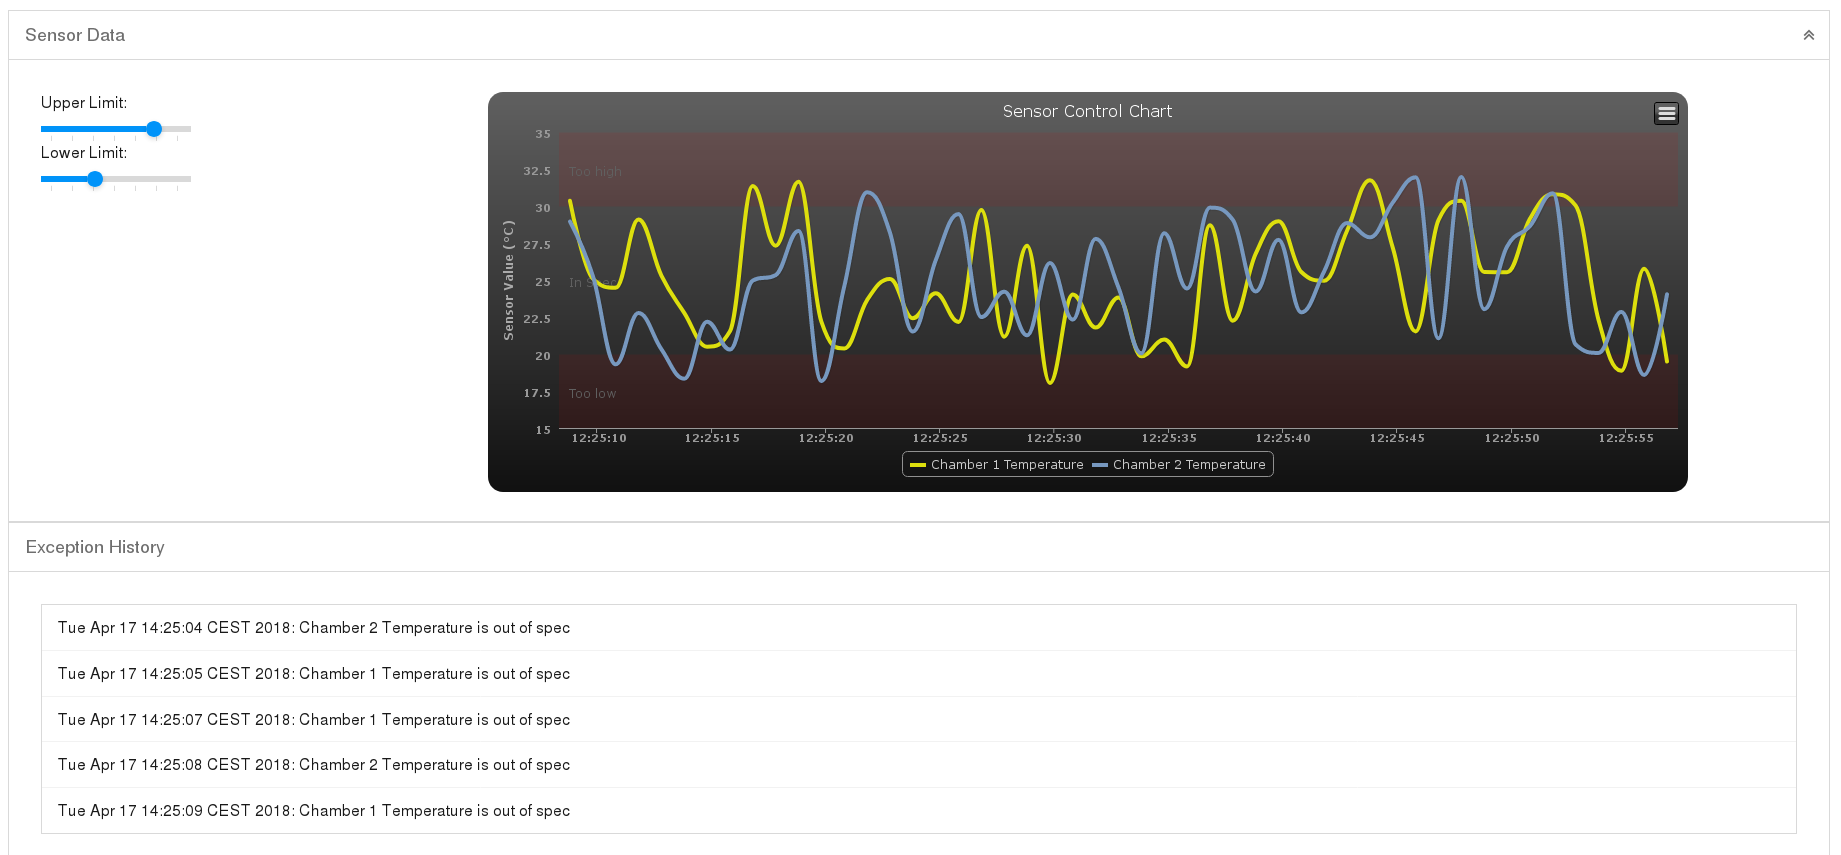
- a line chart displaying one or multiple sensors in real time, auto-updating in an animated fashion
- a list of „exceptions“, meaning events that violated a sensors limits as defined in the control cards
- a timer that frequently updates the chart and exception list (every second in this case)
This is what it looks like:
<?xml version="1.0" encoding="UTF-8"?>
<window apply="com.jdimension.zkspc.controller.SensorComposer">
<borderlayout height="1024px">
<north title="Sensor Data" maxsize="300" size="50%" splittable="false" collapsible="true">
<borderlayout>
<west border="none" size="25%" flex="true" maxsize="250" splittable="false" collapsible="false">
<div >
<label value="Upper Limit: "
/>
<slider id="sliderUpper" mold="scale" width="150px" />
<label value="Lower Limit: "
/>
<slider id="sliderLower" mold="scale" width="150px" />
</div>
</west>
<center border="none" flex="true">
<div>
<charts id="chart" type="spline" marginRight="10"
title="Sensor Control Chart" width="1200" />
<timer id="timer" delay="1000" running="true" repeats="true" />
</div>
</center>
</borderlayout>
</north>
<center title="Exception History">
<borderlayout>
<center border="none">
<listbox id="exceptions">

</listbox>
</center>
</borderlayout>
</center>
</borderlayout>

</window>
The Controller
The controller will parameterize the UI components, receive sensor events as well as „violations“ and update the UI accordingly, without page reloads.
Boilerplate code
What else do we need?
- Application bootstrapping – e.g. automatically starting the event broker. For this proof of concept we use a servlet that is set to load on startup of the web container.
- An event source – in the real world you would receive equipment messages e.g. through JMS or some other API. In our case we built a „fake“ event source that emits random values.
The result
The result is a web application, showing sensor data as it is flowing in, and updating a table with sensors violating their limits.
Conclusion and where to go from here
Using ZK, implementing sophisticated web based UIs is easily done without the hassles of JavaScript / TypeScript and browser incompatibilities. Already have an object model and backend? Fine – you will be very quick in putting a ZK User Interface on top.
One thing you will realize is that the Community Edition of ZK is lacking many features you’d need for Enterprise applications. I feel like I only scratched the surface of their extensive component suite, but quickly ran into „Enterprise“ or „Premium“ only features, such as table layouts and the charting itself. ZK does not provide a special deal for Open Source projects, so it is not an easy decision to make for smaller projects.
To turn this proof of concept into something more sophisticated, there a few steps I’d like to mention:
- As mentioned above, connect it to a real event stream / source.
- Having the Control Card assigned to sensors is not ideal for larger setups. You would rather create a Control Card Processor that takes care of all the Control Cards and acts as an event consumer, and is emitting violation events based on its configuration and the received events.
- Persistence: this PoC does not persist data. For this use case, persistence would be somewhat separated. I would continue to not have the chart use persisted data but the incoming event stream. Rather I would implement an additional „Persisting Event Consumer“ that would take the events and (asynchronously) persist the values for reporting in a separate view. The view we created in this application is focused on observing live events.
- More sophisticated Control Card implementation: just respecting lower and upper limits is too trivial for many situations. Advanced statistical algorithms need be applied in a configurable manner.
The Code
Is on my github: https://github.com/j-dimension/zk-spc